What is a splash page?
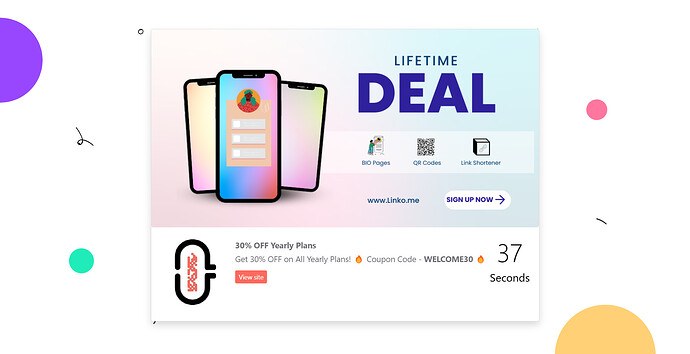
A splash page is a transitional page that appears before visitors are directed to their final destination. It is often used to showcase announcements, promotions, or branding elements.
What is a custom splash page?
A custom splash page allows you to create a branded experience for your audience. You can include a banner, logo, and a personalized message that reflects your brand or company, helping build recognition and trust.
How to create a custom splash page?
To create a custom splash page, follow these steps:
-
Login to your Linko account.
-
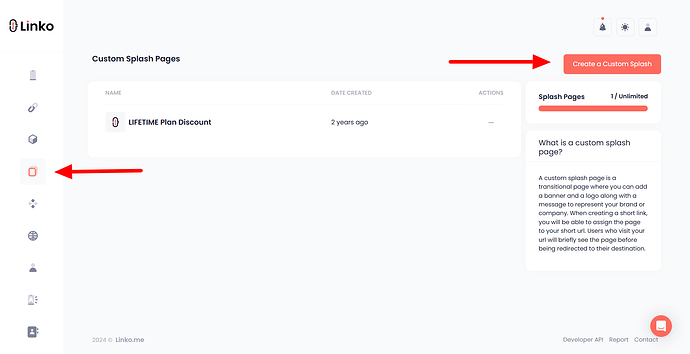
Go to the Custom Splash section.
-
Click on Create a custom splash in the top right corner.
-
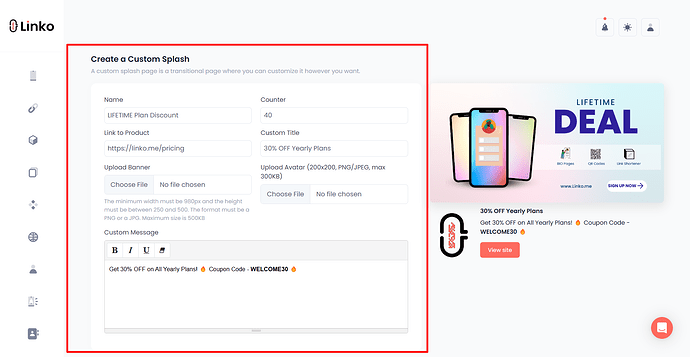
Customize the splash page to align with the specific promotion or offer you are presenting.
-
Name: Assign a unique name to your custom splash page (CSP) so you can easily find and manage it later.
-
Counter: Set a timer for how long visitors will see the splash page before being redirected to their final destination. This adds urgency or focus to your message.
-
Link to Product: Add a link to a product, service, webpage, or anything else you want to promote.
-
Custom Title: Create a custom title that will be displayed on the splash page, letting visitors know what the page is about.
-
Upload Avatar: Upload an avatar, logo, or profile image that represents your brand or company, displayed prominently on the page.
-
Upload Banner: Add a background banner or image that can promote your product or service, or visually engage your visitors.
-
Custom Message: Write a message or description about what the splash page represents. This could include a promotion, event, or any relevant information you’d like to share.
-
You can see an example of CSP here - https://allmylink.me/Custom-Splash-Demo
How do I choose a splash page while shortening a link?
When creating a short link, you can assign a custom splash page to your URL.
Users will briefly see the splash page before being redirected to the final destination, giving you a moment to engage them with your brand.
Follow these steps.
-
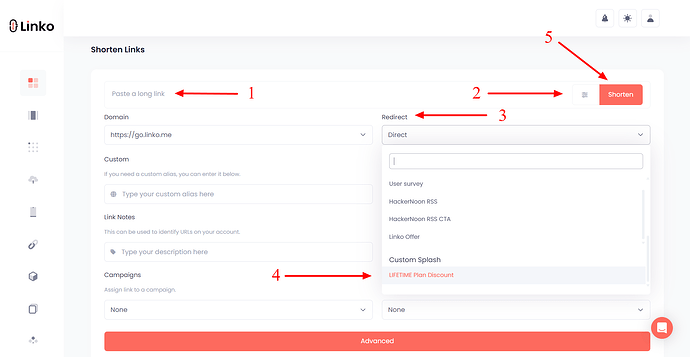
Login to your account and go to dashboard,
-
Paste your long URL,
-
Click on the Redirect option,
-
Select your Splash Page,
-
Then, shorten your link.
How do I add a custom splash page to an already shortened link?
To add a custom splash page to an existing short link, follow these steps:
-
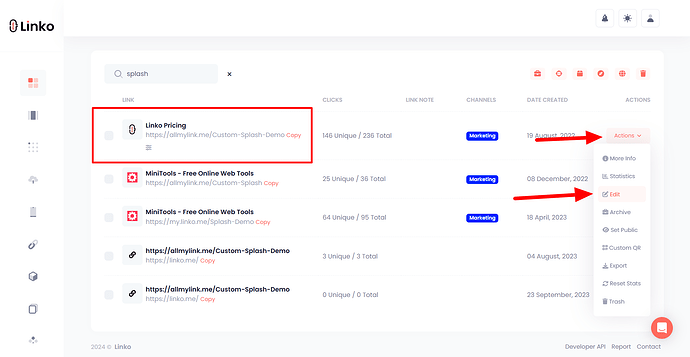
Go to the My Links section in your dashboard.
-
Locate the shortened link you want to update.
-
Click the action icon, then the edit option.
-
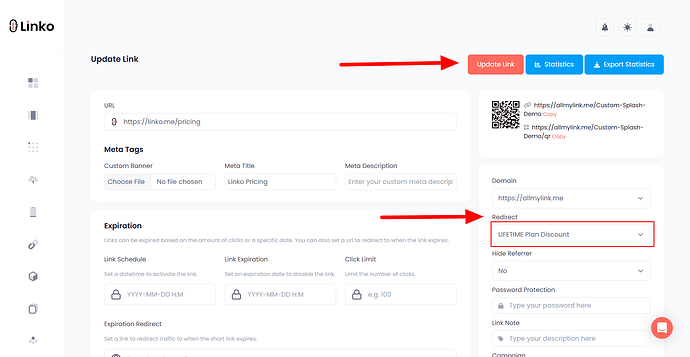
Navigate to the Redirect section and select your custom splash page from the drop-down menu.
-
Click the update link to apply the changes.
How to remove a custom splash page from a shortened link?
To remove a custom splash page from a shortened link:
-
Go to the My Links section in your dashboard.
-
Find the link with the splash page you want to remove.
-
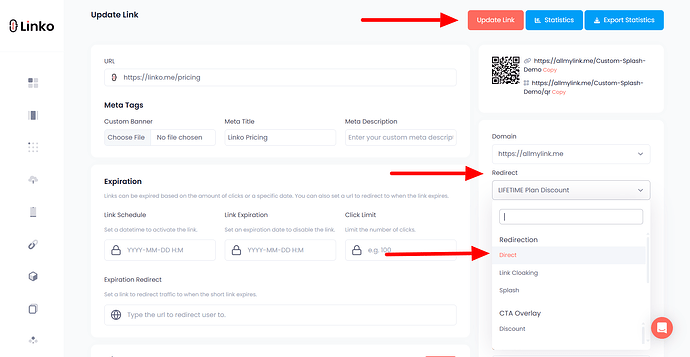
Click the action icon, then the edit option.
-
In the Recirect section, select the direct method from the options to change the short link redirection to direct.
-
Click update link to update the link.
FAQs
Can I create a custom splash page on the free plan?
Yes, with the free plan, you can create one custom splash page.
Will the splash page affect my link clicks or slow things down?
Not usually. Splash pages are designed to appear for a duration that you set.
Can I add custom splash page to multiple short links at once (in bulk)?
No, this option is not available yet. You can only add or remove a custom splash page from a short link one at a time.
Can I change my splash page for different links?
Yes! Linko allows you to set up multiple custom splash pages, so you can tailor them for specific links or campaigns.
For instance, you could have one splash page for a new product launch and another for a seasonal sale.
But you would need a paid plan to create more custom splash pages.
